
 I appreciate today’s short attention span theater, I have a lot to say about kefir. If you want the short version, scroll down, you’ll see it. ?
We have known for many generations about the health benefits of consuming probiotics. Fortunately there are many ways to get those good bacteria into our body. Our ancestors used to make their own probiotic rich foods. Things like yogurt, sauerkraut, kimchi (one of my favorites!), miso (another favorite), pickled foods (salt brined as apposed to vinegar preserved), sourdough starters, the list goes on and on. These were often used as a way to preserve foods before refrigeration was common. Foods would only last so long in their fresh state, we needed to introduce friendly bacteria that would prevent any unfriendly (to us) bacteria from colonizing the food. A beneficial side effect of these friendly bacteria, besides preserving the food, is they are often very good for our gut microbiome.
 This is something I absolutely believe we need to get back to doing, being more self sufficient, being able to grow and preserve our own food, being able to propagate our own health products/produce, not only for our own personal use, but something that can be shared with family, friends, neighbors… as well as a potential source of income, trade or barter.
I have been successfully working with water kefir for a little less than a month now, I knew about milk kefir (a different kind, not interchangeable), it’s easy to find commercial milk kefir in the health food section of our local grocery stores, not so easy to find commercially available premade water kefir. I recently discovered water kefir, the end result of “brewing” that makes a very tasty grown up soda that is actually healthy and so easy and relatively quick to make.
I’ve heard it pronounced many different ways, but I believe the correct pronunciation is “keh-feer” , but kee-fer is another common way I’ve heard, I tend to use both.
❝According to Wikipedia: Tibicos, or water kefir, is a traditional fermented drink made with water and a symbiotic culture of bacteria and yeasts (SCOBY) held in a polysaccharide biofilm matrix created by the bacteria. It is sometimes consumed as an alternative to milk-based probiotic drinks or tea-cultured products such as kombucha. Water kefir is typically made as a probiotic homebrew beverage. The finished product, if bottled, will produce a carbonated beverage.❞
 Water kefir, if taken to a second ferment will self carbonate, it will make a super fizzy drink that you can flavor any way you like. I tend to stick with easy juices I can get locally, apple cider, grape juice, a mixed juice, I go with 100% fruit juice and avoid the juice cocktails which tend to contain little to no real juice, but actually are flavored sugar/fructose water.
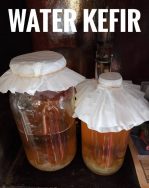
The process is so simple, it doesn’t require much in the way of equipment, chances are you already have what you need in your kitchen or it can easily be found locally. A few glass mason jars (1 quart or larger, preferably large mouth), a few glass bottles with good lids (for the second ferment). A strainer, a measuring cup, a funnel. You’ll need a few coffee filters or a clean cloth to cover the kefir in the jar for the first ferment. It’s best to stick with glass and plastic, metal seems to be detrimental to the kefir, it can slow it or even kill it.
It goes like this, you will need to buy or otherwise obtain some water kefir grains, I bought mine from Amazon here fresh kefir grains, you’ll need some sugar, it must be real sugar, no substitutes, no honey either, honey has antibacterial properties that will kill the kefir. You’ll need room temperature water, filtered spring water, well water, it can be tap water as long as it doesn’t have chlorine or fluoride. You can optionally add a dash of sea salt or pink Himalayan salt, brown sugar or molasses. That’s about it for the first ferment. I’ll include the full directions below.
 You shouldn’t fear the sugar used in the process, it’s for the kefir grains, they need it, they consume the sugar and create probiotics, by the time you pour off the kefir water there is very little to no sugar left. One of the ways you will know your first ferment is complete is to taste the kefir water, if it’s still sweet, you need to let it go another day or so.
videos
For the second ferment, you’ll need the kefir water from the first ferment, some fruit juice and/or sliced fruit (lemons, oranges, other citrus, bananas, ginger…) and you can also add a bit more sugar to help it ferment but that’s not necessary. When it has fermented to your liking, opening the bottle is a real treat, it will fizz like crazy, it really tastes like a special grown up soda, kids even like this. I’ve been feeding it to my hubby and my family for weeks now, everyone who has tried it asks for more.
 The really wonderful thing about water kefir grains is as long as it’s happy and healthy, they will multiply and grow creating a nearly endless supply, by my third batch, I was able to divide off my kefir grains and share them with one of my friends so she could start her own water kefir farm. I just started my 5th batch and I now have 5 quart sized jars brewing with very happy, plump kefir grains. You can continue to reuse your kefir grains to make more and more batches. Each batch takes about 2-4 days to complete, so typically within a week I am able to bottle up several bottles of kefir water to consume, in just a few more days, I’ll double what I have been able to bottle from the first batch.
Short version:
 Buy or otherwise acquire some kefir grains, it takes approximately a week to grow your own healthy, fizzy kefir soda, it’s good for you, it tastes good too. The process is incredibly simple and relatively short, you don’t need to invest in a lot of equipment, you probably already have what you need, or can get it easily.
————————————————————————–
Fresh kefir grains instructions
- Large glass container, 1 quart or larger, wide mouth preferred
- Non metal strainer and stirring utensils
- Coffee filters or cheesecloth or other clean breathable cloth to cover the lid
- Rubber bands to hold it in place
- 1 qt water, room temperature
- 1/4 cup sugar (white, brown, raw.. No honey!)
- 1/4 cup kefir grains
- Optional
- 1 t unsulphured molasses
- 1 pinch sea salt
- 1 pinch baking soda