Here’s the second half of a feature by our fearless DIY renewables enthusiast Mike Davis, on how to build your own solar panel. Part One is lower down the page, and is a free service provided by Off-Grid 101 – the technical and informational part of this web site. Many sites attempt to charge hundreds of dollars for this kind of information:
Now that the structure of the solar panel is finished, it’s time to get the solar cells ready. Once separated from their brick form, they are amazingly fragile and difficult to handle and store. I would recommend leaving them as bricks until you are ready to install them in your solar panel. That way you won’t wreck them before you get to use them. So build the panel first.
Then it’s time to start installing your solar cells. I started by drawing a grid pattern lightly in pencil on each of the two pieces of pegboard, Then I laid out the cells on that grid pattern upside-down so I could solder them together.
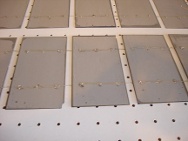
All 18 cells on each half solar panel need to be soldered together in series, then both half panels need to be connected in series to get the desired voltage.
Solder on
Soldering the cells together is tricky at first, but you’ll get the hang of it fairly quickly. Start out with just two cells upside-down. Lay the solder tabs of one cell across the solder points on the back of the other cell. Make sure the spacing between the cells matched the grid pattern.
I used a low-Wattage soldering iron and fine rosen-core solder. I also used a rosen pen on the solder points on the back of the cells before soldering. Use a real light touch with the soldering iron. The cells are thin and delicate. If you
push too hard, you will break the cells. I got careless a couple of times and scrapped a couple of cells.
Now repeat the above steps and solder the cells together until you have a string of six. I soldered tabs from scrapped cells to the solder points on the back of the last cell in the string of six. Then I repeated the whole process two more times to get three strings of six cells for a total of 18 for this half of the panel.
The three strings of solar cells need to be wired in series. So the middle string needs to be rotated 180 degrees with respect to the other two. I got the strings oriented the way I wanted them (still upside-down) on top of the pegboard panel before
the next step of gluing the cells in place.
Careful with that caulk Eugene
Gluing the cells in place can prove tricky. Place a small blob of clear silicone caulk in the center of each cell in a six cell string. Then flip the string over and set it in place on the pencil line grid laid out earlier. Press lightly in the center of each cell to get it to stick to the pegboard panel. Flipping the floppy string of cells is also tricky. Another set of hands may be useful in during this step.
Don’t use too much glue, and don’t glue the solar cells anywhere but at their centers. The cells and the solar panel they are mounted on will expand, contract, flex and warp with changes in temperature and humidity. If you glue the cells too tightly to the
substrate, they will crack in time. Gluing them at only one point in the center allows the cells to float freely on top of the substrate. Both can expand and flex more or less independently, and the delicate solar cells won’t crack.
Next time I will do it differently. I will solder tabs onto the backs of all the solar cells. Then I will glue all the cells down in their proper places. Then I will solder the tabs together. It seems like the obvious way to go to me now, but I had to do it the hard way once to figure it out.
Solar systems are go
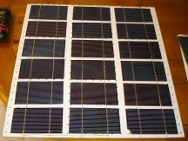
Here is one half panel, finally finished. I used copper braid to interconnect first and second strings of cells. You could use solar cell tabbing material or even regular wire. I just happened to have the braid on hand. There is another similar interconnection between the second and third strings at the opposite end of the board. I used blobs of silicone caulk to anchor the braid and prevent it from flopping around.

YAHOO! It works! In weak sun through clouds the half panel is producing 9.31 Volts. Now all I had to do is build another one just like it.
Once I had two half panels complete, I could install them in their places in the main panel frame and wire them together.
Each of the half panels dropped right into their places in the main panel frame. I used four small screws to anchor each of the half panels in place.
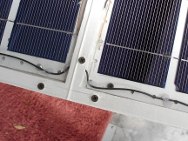
Run wires to connect the two half panels together through the vent holes in the central divider. Again, use blobs of silicone caulk to anchor the wire in place and prevent it from flopping around.
Diodes required
Each solar panel in a solar power system needs a blocking diode in series with it to prevent the panel from discharging your batteries at night or during cloudy weather. I used a Schottky diode with a 3.3 Amp current rating.

Schottky diodes have a much lower forward voltage drop than ordinary rectifier diodes, so less power is wasted. Every Watt counts. I got a package of 25 31DQ03 Schottky diodes on Ebay for only a few bucks. So I have enough left-overs for lots more solar panels
My original plan was to mount the diode inline with the positive wire outside the panel. After looking at the spec-sheet for the diode though, I decided to mount it inside since the forward voltage drop gets lower as the temperature rises. It
will be warmer inside the panel and the diode will work more efficiently. More silicone caulk was used to anchor the diode and wires.
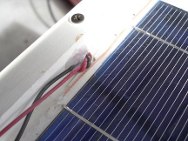
I drilled a hole in the back of the panel near the top for the wires to exit. I put a knot in the wires for strain relief, and anchored them in place with yet more of the silicone caulk.
It is important to let all the silicone caulk cure well before screwing the plexiglass covers in place. I have found through past experience that the fumes from the caulk may leave a film on the inside of the plexiglass and the cells if it
isn’t allowed to thoroughly cure in the open air before screwing on the cover.
Use still more silicone caulk to seal the outside of the panel where the wires exit.
Male or female plug?
I added a polarized two-pin jones plug to the end of the panel wires. A mating female plug will be wired into the charge controller I use with my home-built wind turbine so the solar panel can supplement it’s power production and battery charging capacity.
A note of warning here. Power sources should always have female pugs on them to prevent short circuits.
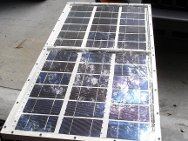
Here is the completed panel with the plexiglass covers screwed into place. It isn’t sealed shut yet at this point. I wanted to wait until after testing it because I was worried that I might have to get back inside it if there were problems.
Sure enough, a tab popped off one of the cells. Maybe it was due to thermal stresses or shock from handling. Who knows?
I opened up the panel and replaced that one cell. I haven’t had any more trouble since. I will probably seal the panel with either a bead of silicone caulk, or aluminum AC duct tape wrapped around the edges.
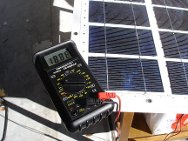
Here I am testing the Voltage output of the completed panel in bright winter sunlight. My meter says 18.88 Volts with no load. That’s exactly what I was aiming for.
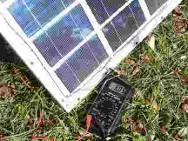
Here I am again testing the current capacity of the panel, again in bright winter Q sunlight. My meter says 3.05 Amps short circuit current. That is right about what the cells are rated for. It means the panel is working very well.
So how much did all this cost to build? I have a well stocked work shop so many of the materials were available free. My biggest costs were $74 for the solar cells from e-bay, $20 for lumber and $6 for the Jones Plug. You probably wont find commercial panels for much under $400, so that’s a fraction of what a commercial solar panel would cost. And then of course there is all that free power.
It’s about more than money
But its not just about saving money. I got deep satisfaction from designing and building the panel, my beautiful Arizona hideaway is just that little bit more comfortable. All I have to do now is find time to get down to the real point of the
exercise which was watching the stars.
PS I get dozens of requests for help each day. Sadly I simply don’t have time to answer the majority of them. I have created a FAQ to handle these repetitive questions.
But there is no way I can help you out with complex issues, teach you electronics theory, help you locate parts, build a charge controller for you, or custom design a system for you. There just aren’t enough hours in the day. Sorry. Good luck, Mike Davis.
19 Responses
panels are as low as $58 from http://www.sunelec.com now… i bought a pallet when it was that low, now u need to buy 2… but at $58 a panel for 60 watts, its favorable, albeit dealing with 67-89vdc is difficult.
GREAT REPORT!
THANKS
I will add that you can get a 45 watt (3) panel solar system at Harbor Freight company on sale now for $199
But make one sounds fun too
I did the math to see what kind of pay back you would get.
it runs at 3.3 amps at 18.88 volts = 62.304 Watts
Thats 0.062 KW it probably runs for about 360 hours a month on average (12 hours of day light a day) that means it makes 22.32 kWh at a constent rate. At 23.3 cence a Kwh over a year this solar panel generates $62.41 dollars a year of energy. This means at $100 your looking at 19.3 month pay back.
If it lasted 10 years over 10 years you would save $523.72 per panel or $52.4 a year per panel over 10 years
Lets say you live somewhere cloudy it only works half the time at worse thats still a 38.6 month or just over 3 year pay back. If it lasted 10 years over 10 years you would save $423.35 or $42.3 a year per panel over 10 years
mbthorman2010 – global warming is a hoax!
This is cool to see, I had wondered how people were claiming to be able to make their own solar panels cheap. One of the things he doesn’t mention in the cost part is what he spent for the plexiglass to cover the panels and it also sounds like he used a fair amount of caulking. I know this sounds nitpicky but good caulking isn’t cheap and plexiglass certainly isn’t. Either way, it’s a tremendous savings over commercial panels.
Several people talked about ROI and costs to power your house, etc.
Something to keep in mind, in many states, Arizona included, there are incentives and rebates and such that require commercial grade stuff to get… just doing quick numbers, adding about what I suspect his cost would be by the time the plexiglass and such was added.
I put in a big system, about 10,000 watts and it was right about $70,000… the panels were about $56,000 of that.
Just to make the numbers easy, lets say I spent a total of $7/watt and the panel was $5.5/watt.
The remaining $1.5/watt was for inverters and installation.
Mike built his 60 Watt panel for roughly $120 (again, guessing for plexiglass, caulking, etc) or $2/watt. Figure either way you need inverters and such, let’s figure if you scaled this up you could do 10,000 watts for $3.50 ($2 + $1.50) per watt or a total of $35,000.
Cool… doing it yourself could save you $35,000… not too bad.
But… once my system was installed, inspected, and operational, I was eligible for $3/watt credit from the power company or $30,000, a $1000 state income tax credit, and a 30% federal tax credit ($70,000 * 30% equals about $21,000)
So… $70,000 – $30,000 – $21,000 – $1,000 equals roughly $18,000… and my system is connected into my house electrical panel and helps to run everything whenever the sun is out which in my area is the most expensive power. I don’t have to worry about a battery bank and the maintenance and dangers that go with that.
Mike did his because he doesn’t have the grid available and I think it’s wonderful. As he says, he’s using it to charge batteries and things so he doesn’t need inverters, power company approval, or big banks of batteries… a very efficient and effective use of solar power. But, for peope who want to scale up to making enough power to actually run a significant portion of their house, a commercial, licensed install can actually end up cheaper.
I welcome questions about this and will answer as time permits. Please feel free to write me at yumadome@yahoo.com
Thanks for the interesting article Mike. I recently retired and bought a house in the country and hope to become as self-sufficient as possible. I did a little research which I will present here as it may be of some interest. I went to Ebay and found this ad…
“This is for 108 5×6 cells we cut from larger cells[all cells are cut from something] we have resealed the cut edge with a high temp. electrical epoxy, these are factory detabs the tabbing was removed in the factory by hot air some solder has been blown around and there are some very small spots on some of the cells, that is easy to remove, these are easy to use the cell is pre tinned by the factory tabbing process, these are 6.7 AMP THATS RIGHT 6.7AMP .5V these are 16% eff. thats .226AMP per sq. inch. you can not buy the low power 3×6 cells this cheap, THIS IS THE REAL THING.”
So each cell is (5″)x(6″)=30 sq.” Each cell produces (30sq.”)x(.226A)=6.78A. 6.78A x .5v = 3.39 watt (IxE=P). 108 x 3.39W = 366.12W total power. 108 x 30 sq.” = 3240 sq. in. 144 sq. in. = 1 sq. ft. 3240 sq. in. = 22.5 sq. ft.
We can see from the above that our assembled panel will cover 22.5 sq. ft. and produce 366.12 Watts. The solar cells are 16% efficient which is pretty good. 366.12watts/22.5sq.ft=16.272 watts/sq. ft. In full sun, you can safely assume about 100 watts of solar energy per square foot. If this panel was 100% efficient we would expect to produce about 100 watts but we are producing 16.2 watts…so it is 16% efficient.
If we assume 6 hours/day of full sun to allow for cloudy days and seasonal changes we will produce 366.12 watt x 6/hr. = 2196.72 watt (2.197 KW)/day. I live in North Carolina and I pay $0.12/KWH, which is the national average, so…$0.12/kwh x 2.197kw = $0.26364/day. This panel would produce about 25 cents worth of electricity per day for me if I used it directly as a direct current source (DC). If I stored it in a battery for later use I would only be able to recover about 80% ($0.26x.8=$0.20), or 20 cents. If I recover the energy using an inverter to convert to 120v AC it would be considerable less due to the inherent losses.
The 108 cells were advertised at $150.00 + $17.44 = $167.44 (cost + shipping). The payback would then be $167.44 / 0.26/day = 635.108481262 days (1.740023236 years = 1yr,9mo.). If I add in the cost of building the frame…lets say it all comes to a total of $300.00 then the payback becomes $300 / .26364/day = 1138 days (3.12 years = 3yr,1.5mo.). Not too bad expecially if their was any rebates available from local, state or federal.
According to the US Department of Energy, an average American household used approximately 866-kilowatt hours per month in 1999 costing them $70.68. Now it would be $104.00./mo.
For anyone interested David Butcher has a design for a human pedal powered generator that can produce about 300 watts per hour of exercise, which if added to this solar powered setup would double the amount of energy produced. https://www.los-gatos.ca.us/davidbu/pedgen.html
@Dick, did you miss the part where the author mentioned his eventual use for the solar panel was located *OFF GRID*?
@Brendon, where did you get the idea the author was your own personal slave? Grow a braincell and then learn how to think for yourself already.
Why is it that braindead morons always try to ruin it for everybody else?
To the author: Thanks for the write-up and the inspiration. I plan to use some of the ideas you portrayed here.
I live in rural/forested area of Costa Rica on the slopes of a mountain. One gets used to having to have independent back up systems when living in such environments. As global warming progresses almost unchecked, we also need to thing about how we will provide basics for survival. In my area the most important resource which is endangered is water. I am planning now for rain water collection systems, recycling of water used, and ways to minimize water usage. Some of this requires solar powered pumping and wind power added to the mix for generating essential energy. A very small farm such as mine can produce enough food to sustain a family of four or five as long as we have water available for irrigation as our water resources begin drying up. Knowing how to make one’s own solar panels, wind turbines, and water recovery systems is a matter of survival.
Dick, not everyone is concerned with ROI, at least not in the traditional sense. I guarantee you, when the lights in your city, or even on your block, when you are sitting there with the only lights on in the area, ROI takes on a whole new meaning.
Being independent from the system has a lot of value in itself. I am 100% off-grid, I generate all of my own power and store it in batteries, I didn’t break the bank to get here, I can tell you from experience how good it feels when the power goes out in the neighborhood and I’m not even aware of it.
With the aging utility infrastructure, more and more people getting on the grid, we are just one hot summer, one extra cold winter blizzard/ice storm, one hurricane away from major power outages. Being energy independent, even on a small scale (ie your house), is priceless.
But it’s ok with me if you want to sit back and spout ROI numbers as an excuse/reason not to get off the grid, or at least have some sort of backup system, those of us who look at life though a different lens will be sitting in our lit up houses while you will end up sitting in the dark, hope your numbers keep you warm and bright. :)
Wretha
The solar panel appears to make 60 watts at full sun. Assuming an very optimistic 8 hours a day for 365 days that is 175 kwh of power. Electric prices vary but using 15 cents per kwh this would work out to $26.50 of power per year, or 4 years just t0o break even.
As to lighting a 60 watt bulb or several compact fluorescents you need 120 volt AC for the latter which means buying an inverter. Also you probably donot need the light bulbs midday but at night, so some battery storage would be desirable, another expense.
Awesome, pure awesomeness, though many people commenting are obviously ignorant what really has been achieved here. (i can’t spell by the way, put that down to be a programmer).
I say let all the auto makers go under. If that means we drive Toyota’s, Nissan’s and Honda’s then so be it. If the American automakers had been thinking about the future instead of marketing and making million on over sized SUV’s then they wouldn’t be in the trouble they are in now.
The local codes in most areas in the US won’t allow you to install a homemade solar panel on your house, it needs to be UL listed. Don’t believe all of those bogus sites that promise you can power your house for $200, you can’t. Also, besides the solar panel, you also need an approved inverter to convert the DC power from the solar panels to AC that your appliances need.
brendon –
energy savings depend on how much you’re currently paying.
the panel described is putting out 18.9V, 3.05 A, which is just under 60W.
That means in full sunlight it’s generating enough power to keep a horribly inefficient light bulb bright, or a 4-5 efficient ones.
It is preferable to use low temperature solder for solar cells, particularly if the cells have no tabs. Normal 63/37 SnPb solder flows at a rather high temperature for this application. Special low temperature solders containing various elements such as indium, antimony and silver are available.
also, IF your effort is to convince people that this technology can provide for them, you have to assume that some or most of them will be sceptical, and doing nothing to motivate them with how well it will provide for them, will, inturn only encourage them to think its just a scam or at best a cool project, dont mean to be negative but i have personally been ripped off by do it yourself claims, and would hate to see a great technology like this lack because it didnt provide crucial information
good breakdown of the technology, however i find all this indepth information very incomplete without simply adding even an approximate energy savings, why is that? people dont want to build solar panels, they want to build solar panels and use them to save money, i realize the results may vary but why do such a thorough job of teaching how to do it without even touching on the subject of what it will do for you? im not very technical so maybe i simply missed that, but if your building this to save money, the fact that nobody offers a electrical production vs. money saved convertion seems REALLY strange
You mention using silicone caulk, most silicone caulks at least hardware store variety use some form of acetic acid as a curative agent. This is detrimental to electronics and wiring, especially very delicate wiring.
Did you find a non acid based silicone caulk? Sorry if it was mentioned in the first half as I did not see that.
This sounds incredibly labor-intensive to me. However, I think this would be a great summer project for kids (well supervised, of course) to make for rec centers, churches, homeless shelters, etc.–something that those kids could point to years later and say with pride “I did that, and it’s still making power!”
Excellent project–I’m impressed.