
In this article I am going to describe how to build a photo voltaic solar panel for a fraction of the price you would pay a manufacturer. I’ll show you how inexpensive materials and common tools can be used to make panels that rival commercial products in power production, but blow them away on price.
Several years ago I bought a remote property in Arizona. I am an astronomer and wanted a place to practice my hobby far away from the sky-wrecking light pollution found near cities of any real size. I found a great piece of land, but it’s so remote that there is no electricity. That’s definitely a good thing- no electricity equals no light pollution. But it would be nice to have at least a little power, since so much of life in the 21st century is dependent on it.
Initially I built a wind turbine. And it works great… when the wind blows. It was soon clear however that I needed not only more power but more dependable power.
I do get well over 300 sunny days a year on the property though, so solar power seemed like the obvious choice to supplement the turbine. My problem was cost –as I say, I’m an astronomer and the price of solar panels is astronomical. So I decided to try my hand at building my own.
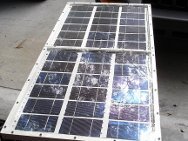
Really a solar panel is just a box that holds an array of solar cells. Solar cells are the things that do the actual work of turning sunlight into electricity. Sorry to any one who thought I was going to tell them how to make their own cells. As far as I know it is impossible without complex production facilities.
Seconds from e bay
However it takes a lot of cells to make a useful amount of power, and being largely glass, they are very fragile. That’s why individual cells are assembled into protective panels. It doesn’t sound too complicated. I was convinced I could do it myself. It was clear however that the main stumbling block to building solar panels is acquiring solar cells at a reasonable price. But once I realised that I could use blemished and factory-second solar cells to build my panels and that they were available on e bay , I got down to work.
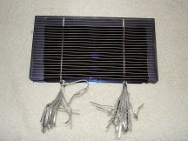
I started by buying a couple of bricks of 3 X 6 mono-crystalline solar cells on Ebay It takes a total of 36 of these type solar cells wired in series to make a panel. Each cell produces about 1/2 Volt. 36 in series would give about 18 volts which would be B good for charging 12 volt batteries. (Yes, you really need that high a voltage to effectively charge 12 Volt batteries).
This type of solar cell is as thin as paper and as brittle and fragile as glass. They are very easily damaged. The seller of these solar cells dips stacks of 18 in wax to stabilize them and make it easier to ship them without damaging them. The wax is a real pain to remove though. So, if you can, find cells for sale that aren’t dipped in wax. Keep in mind though that they may suffer some more damage in shipping.
Another tip. Buy cells with tabs on them. You are already going to have to do a lot of soldering to build a panel from tabbed solar cells. If you buy cells without tabs, it will at least double the amount of soldering you have to do. Tabbed
cells are well worth the extra.
All together I bought enough cells to make 2 panels. I knew I’d probably break or otherwise ruin at least a few during construction, so I bought extras.
There are lots of other sizes of solar cells besides 3 X 6 inches available. You could use larger or smaller cells for your panel. Just keep a few things in mind.
Solar cell facts
-Cells of the same type all produce the same voltage no matter what size they are. So the same number of cells is always needed.
-Larger cells produce more current (Amps) and smaller cells produce less current.
-The total power your panel can produce is determined by Amps X Volts.
So using bigger cells produces more power, but the panel will be large and heavy. Using smaller cells keeps the panel small and light, but won’t produce as much power. Also, mixing cell sizes is not a good idea. This is because the current your
panel can produce will be limited by the smallest cell in the group and the larger cells won’t work to their full potential.
The cells I settled on are 3 X 6 inches in size and are rated at roughly 3 amps. I wired 36 of them in series to get a little over 18 volts. The result was a panel capable of delivering almost 60 Watts of power in bright sunlight. It doesn’t
sound like a lot, but it sure beats no power at all, which is what I had on my property before.
Of course they only work when the sun is shining. So I use it to charge up batteries which are primarily used for powering lights and small appliances for only a few hours after dark. Once I go to bed, my power requirements drop to almost nothing. So 60 Watts is actually quite a lot of useful power, especially when I also have my wind turbine adding to the power production when the wind is blowing.
After you buy your solar cells, put them away in a safe place where they won’t get dropped, played with by the kids, or eaten by the dog until you are ready to install them in the panel. I can’t stress this enough. Excessive handling will turn
your expensive solar cells into shiny little blue fragments that aren’t useful for anything.
A solar panel is just a box
When it comes down to it, a solar panel is really just a shallow box. So that’s what I started building. (The box is shallow so the sides don’t shade the solar cells when the sun comes at an angle.)
The box I designed is made of 3/8 inch thick plywood with 3/4 X 3/4 pieces of wood around the edges. The pieces are glued and screwed in place. This panel will hold 36 3 X 6 inch solar cells. I decided to make 2 sub-panels of 18 cells each just so make it easier to assemble later. So there is a center divider across the middle of the box.
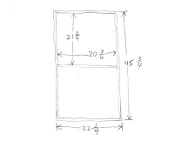
Each sub-panel will fit into one well in the main panel. The side pieces are 3/4 by 3/4 and go all the way around the edges of the plywood substrate. Another piece goes across the center to divide the panel into two sub-panels. This is just the way I chose to do it. There is nothing critical about these dimensions, or even the overall design. Feel free to deviate in your own design, you may well come up with something better.
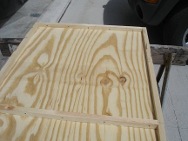
Here (below right) is a close-up showing one half of the main panel. This well will hold one one 18 cell sub-panel. Notice the little holes drilled in the edges of the well. These are vent holes to keep the air pressure inside the panel equalized with the outside, and to let moisture escape. These holes must be on the bottom of the panel or rain and dew will run inside. There must also be vent holes in the center divider between the two sub panels.
Venting is crucial
After a little use I learned that the vent holes should be at least 1/4 inch in diameter. And you should stuff a little fiberglass insulation in the holes in the bottom rail of the panel to keep dust and critters out.
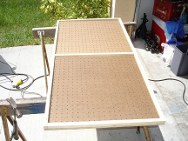
Next I cut two pieces of masonite peg-board to fit inside the wells. These pieces of peg-board will be the substrates that each sub-panel will be built on. They were cut to be a loose fit. You don’t have to use peg-board for this. I just happened to have some on hand. Just about any thin, rigid and non-conducting material should work.
To protect the solar cells from the weather, the panel will have a plexiglass front. Glass could also be used, but it’s too fragile. Hail stones and flying debris that would shatter glass will just bounce off the plexi.
Plexi is not flexi
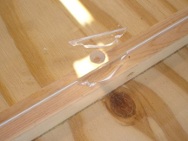
But be careful working close to the edge of the plexi. I drilled and countersunk holes all around the edges of both pieces of plexiglass so I could screw them onto the face of the panel with 1 inch drywall screws. If you get too aggressive it will break. I just glued the broken piece back in and drilled another hole a short distance away.
Next I gave all the wooden parts of the panel several coats of paint to protect them from moisture and the weather. The box was painted inside and out. The type of paint and color was scientifically selected by shaking all the paint cans I had laying around in my garage and choosing the one that felt like it had enough left in it to do the whole job.
I also painted the peg-board pieces with several coats on both sides. That’s important. If you don’t, they will curl when exposed to moisture. Curling could damage the solar cells that will be glued to them.
For the rest of Mike’s guide to building your own sola panel, read part 2 – out tomorrow – we are very pleased to present this handy guide for free because there are so many scams out there at the moment offering to sell you this advice for up to $200
11 Responses
Thank you for this elaborate article. I think you should write it as an ebook for easy distribution especially to developing countries that may have cell phones but no sustained electricity.
I think this is a great article and easy to understand. Depending on your situation, a 50 dollar difference between making your own and buying one could be a big deal, plus there is an amount of satisfaction of making things yourself. I would probably buy one because I am not as technically skilled shall we say, but it’s nice to know that if I needed to it’s right here.
Back in the 80’s when panels were super expensive, I built a solar panel myself. I used wood and similar materials as mentioned above. That was a big mistake. Within a short period of time the elements caused the wood to warp and the plastic parts to decay. Moisture was a problem also. To say the least, the panel was unfunctional within a very short period of time. So I can’t recommend putting one together unless it has a perfect seal and the components can’t decay from the elements.
We need more input on HOW TO OBTAIN THE LESS EXPENSIVE CELLS!
Cool concept, just not very economical like others have said.
I applaud the effort that leads to understanding the system and creating something with your own hands. Price aside, it’s usually the most satisfying route. I echo the previous comment though that purely on a time and money comparison, this doesn’t necessarily work out. New amorphous, or ‘thin film’ panels, are widely available now (60W for about $120). It should be noted that the author used crystalline cells, and a crystalline panel would be more expensive. Overall, looks like a good project. You should post it on Instructables.com!
I like the effort, and I like the move to go solar, but did you really save that much money? Solar Panels are priced by the watt, and even at the high price of $5/watt, you’re still only saving $200 to have a product without a warranty, and with a lot of work. You can get them even cheaper than that.
I’m not knocking your post though, I like knowing how to do it, I just don’t think it’s much more efficient.
Did you make the windmill?
Great article, wish there were more like it out there. Keep up the good work and this society might survive afterall.
I remember reading this a while back, but since it’s been so long I look forward to reading part II!
There should be more articles like this here. I used to be a techie in a former life, so I could understand what was written, and so should most other people.
Now, this is a practical idea:
“The type of paint and color was scientifically selected by shaking all the paint cans I had laying around in my garage and choosing the one that felt like it had enough left in it to do the whole job.”
Waste not, want not, as the old saying goes….